How to setup Chat for Dynamics 365 Portal? Part 2 of 2

hat for Dynamics 365 is an engagement channel that enables chat operators to connect with customers in real-time. Chat can only be used if you have an active subscription of Microsoft Dynamics 365 for Customer Service Enterprise or Customer Engagement Plan in your tenant. This guide explains the steps to help you sign up for a trial of Chat for Dynamics 365.
This article consists of 2 parts and covers such topics:
- Part 1. Initial setup
- Part 2. Omnichannel chat configuration and testing
By the end of reading it, you will be able to setup the Portal Chat and start using it.
Omnichannel chat configuration
PROVISION OMNICHANNEL FOR CUSTOMER SERVICE APPLICATION
Ensure that you are either a Global Tenant Admin or Dynamics 365 Service Admin of your Dynamics 365 org to be able to provision the Omnichannel for Customer Service application.
- In the Dynamics 365 Administration Center, got to the Applications tab, select Omnichannel for Customer Service, and then select Manage.

The Omnichannel for Customer Service option will appear only if you have an active subscription of Dynamics 365 for Customer Service Chat.
2. On the Manage Omnichannel Instances page, select Add Org to add an organization. Omnichannel is set up on the organization instance that you add here.

As an admin, you can configure Omnichannel on multiple environments (instances). You can view the status of all organization instances where the Omnichannel app has been configured in the Manage Instances view.
3. Select the organization in the Organization Selector drop-down list.

You must select the checkbox for Privacy terms, and proceed with the setup.
4. On the Enable Chat with Omnichannel page, select the checkbox to enable the Chat channel for your organization. To proceed with the setup, select the Continue arrow

5. On the Summary page, select the check mark icon to provision Omnichannel in your organization.
The setup can take a few mins. You may close the window and check after some time, or refresh to check if it’s complete. Once the setup is complete, the selected channels are enabled in your environment.
ASSIGN ROLES AND ENABLE USERS FOR OMNICHANNEL FOR CUSTOMER SERVICE
Follow these steps to assign Omnichannel roles to users in the Dynamics 365 web application:
- Go to Settings > Security > Users
- Select the user or users from the list for whom you want to assign a security role
- Select Manage Roles in the menu
- In the Manage User Roles dialog box, select a security role or roles that you want to provide to the user, and then select OK
Omnichannel users (agents and supervisors) should be assigned Customer service app access role.
ROLES AND THEIR PRIVILEGES

SET UP CHAT QUEUE
- Go to the Omnichannel Administration App > Queues
- To create new queue click New button
- Fill all mandatory fields and click Save button
- Add some user accounts to this queue

CREATE A LIVE CHAT WORKSTREAM
- In the Omnichannel site map, go to Work Streams and select New from the command bar
- On the Summary tab of the new workstream page, provide the name of the workstream
- In the Channel drop-down list, select Live chat as the channel
- Select Save to save the live chat workstream

CONFIGURE A CHAT WIDGET
- Go to Channels > Chat
- Select New to create a chat widget. The New Chat Widget page opens
- Fill out all mandatory fields and click Save
- Copy the widget snippet code from the Code snippet section. This snippet code will be used in the next step

EMBED CHAT WIDGET IN THE PORTAL
- Open Dynamics 365 Portal app
- Go to Portal > Content Snippets
- Find the Chat Widget Code content snippet and open it

4. On the General tab, scroll down to the Value (HTML) section
5. Paste the chat widget snippet code in the HTML tab

6. Save the changes. The chat widget is now embedded into the portal. By default, the chat widget is displayed in a minimized mode as follows:

PRE-CHAT SURVEY
A pre-chat survey allows you to collect information from the customers. This information can be used to route the chats properly. Chat widget from this example will ask customer one question “What can we help you with?”. This question will be used to set up routing rules.
- Go to the Omnichannel Administration App > Channels > Chat
- Open your previously created widget
- Go to Pre-chat survey tab and click Add question
- Fill out all fields as shown on the screenshot and click Save

SET UP ROUTING RULES
- Go to Work Streams
- Open your previously created workstream
- Go to Routing rule items and click Add
- Fill out all fields and add the condition as shown in screenshot and click Save

Testing by user roles
TEST IT AS A CUSTOMER
- Go to your Customer Portal
- On the main page of the portal, in the bottom right corner, you should see the minimized icon of the chat
- Start new chat session by clicking on the chat icon
- Answer to question

TEST IT AS AN OPERATOR
- Log in to Dynamic 365 as a user with Omnichannel Agent role. This user must be in the right queue. For this example it’s Billing queue.
- Open Omnichannel for Customer Service app
- When a portal customer starts a new chat session you should see the notification:
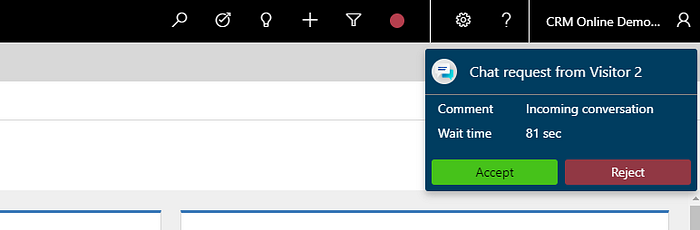
4. Click Accept
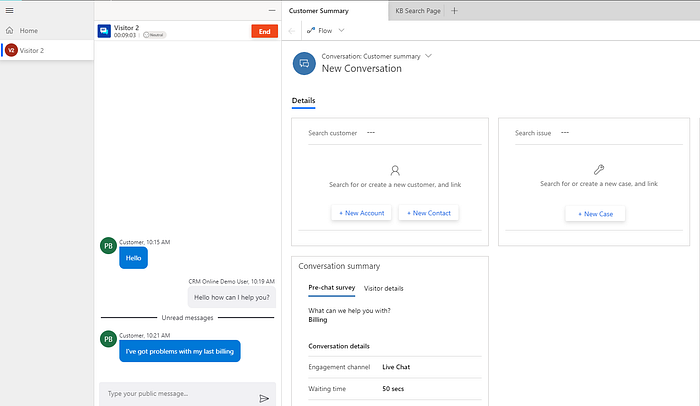
Now you can communicate with this customer as a chat operator
Final thoughts
So now you know how to set up Chat for Dynamics 365 Portal. We covered such topics as how to get a subscription for the Chat, how to enable Chat in your organization, how to configure Chat widget and how to test it.
If you want to dive deeper into this topic, you can check the Omnichannel for Customer Service Guide by Microsoft.
Try this setup guide and let us know what you think.
This article first appeared on the UDS blog by the Team.
